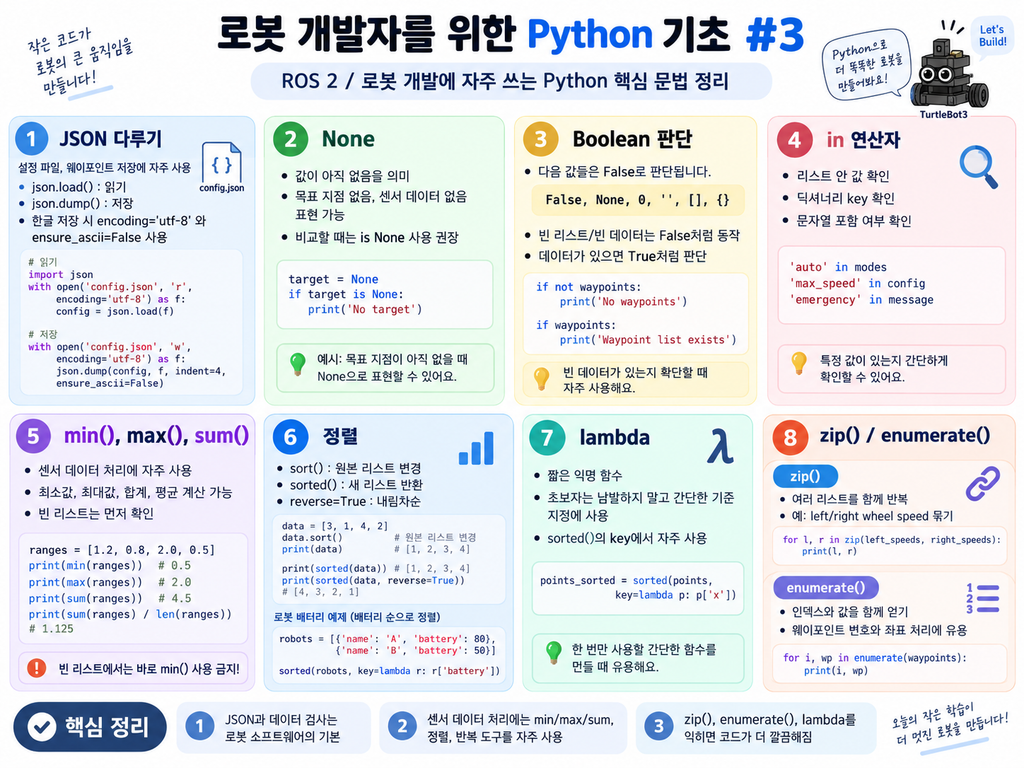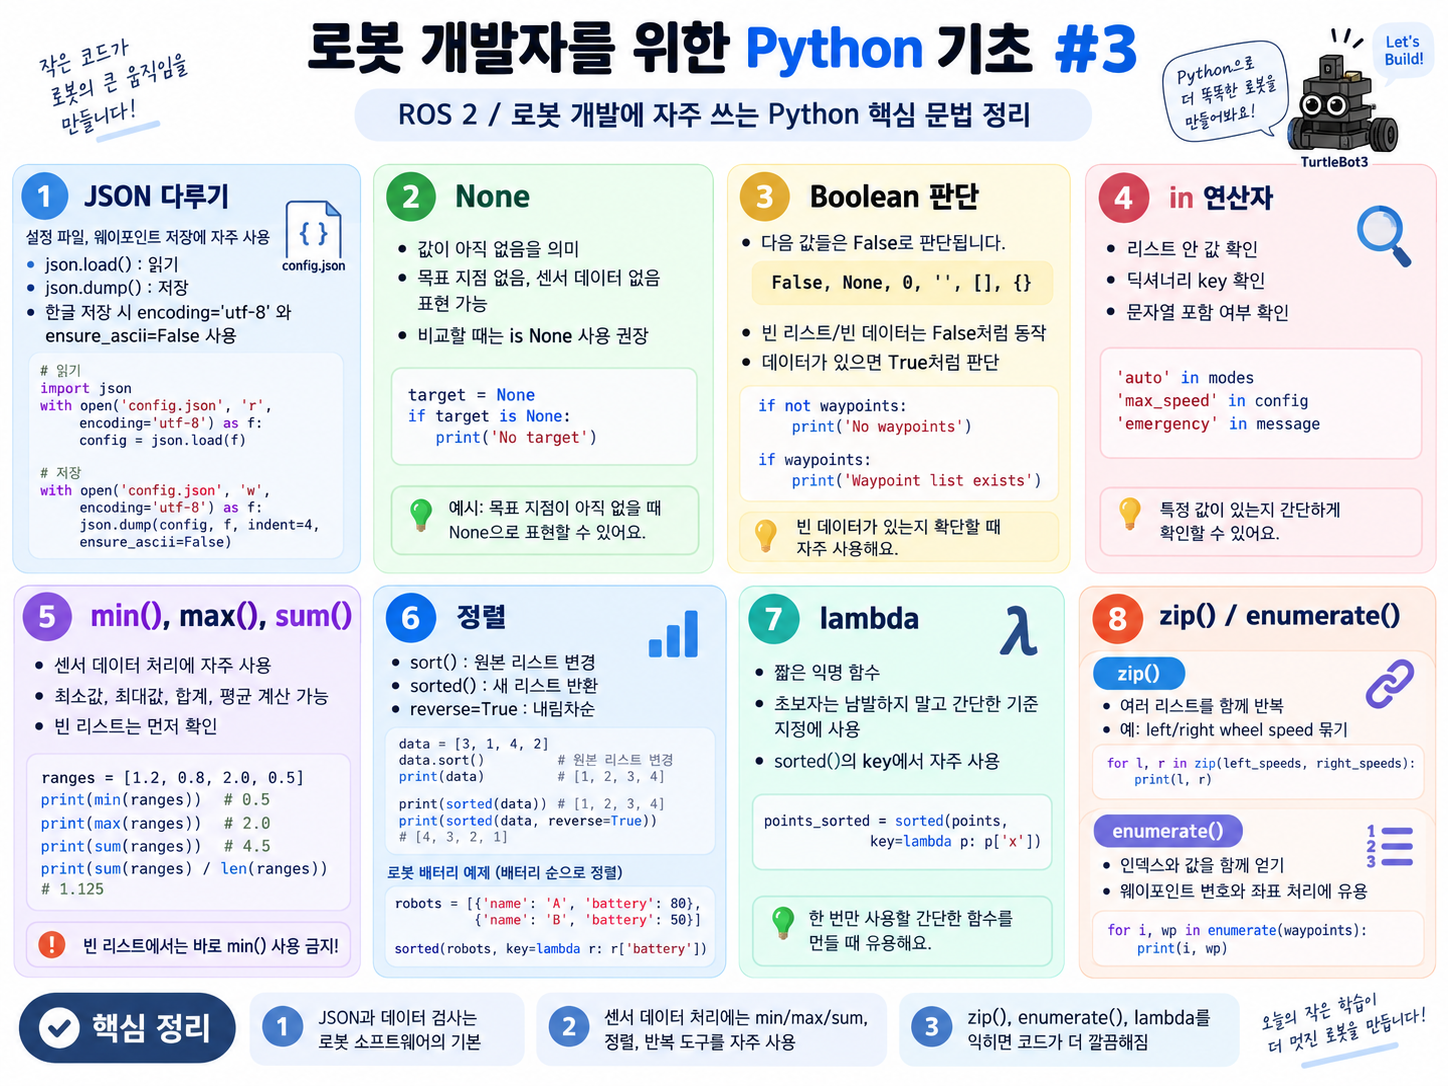
21. JSON 다루기
로봇 설정이나 웨이포인트 파일은 JSON 형식으로 저장하는 경우가 많습니다.
예를 들어 다음과 같은 JSON 파일이 있다고 가정합니다.
{
    "robot_name": "delivery_robot",
    "max_speed": 1.2,
    "waypoints": [
        [0.0, 0.0],
        [1.0, 0.0],
        [1.0, 1.0]
    ]
}
Python에서 JSON을 읽으려면 json 모듈을 사용합니다.
import json

with open("config.json", "r") as file:
    config = json.load(file)

print(config["robot_name"])
print(config["max_speed"])
print(config["waypoints"])
Python 딕셔너리를 JSON 파일로 저장할 수도 있습니다.
import json

config = {
    "robot_name": "delivery_robot",
    "max_speed": 1.2,
    "waypoints": [
        [0.0, 0.0],
        [1.0, 0.0],
        [1.0, 1.0]
    ]
}

with open("config.json", "w") as file:
    json.dump(config, file, indent=4)
한글이 들어간 JSON을 저장할 때는 다음처럼 쓰는 것이 좋습니다.
with open("config.json", "w", encoding="utf-8") as file:
    json.dump(config, file, indent=4, ensure_ascii=False)
1) open(“config.json”, “w”, encoding=”utf-8″)
open("config.json", "w", encoding="utf-8")config.json 파일을 엽니다.
- “config.json”: 저장할 파일 이름
- “w”: 쓰기 모드
- encoding=”utf-8″: 한글이 깨지지 않도록 UTF-8 사용
주의할 점은 “w” 모드는 기존 파일이 있으면 내용을 지우고 새로 씁니다.
config['hangul_test']="한글입력"입력하고 아래의 명령어로 파일을 저장합니다.
with open("config_han.json", "w", encoding="utf-8") as file:
    json.dump(config, file, indent=4)
config_han.json 파일을 노트북에서 열어 보면 한글이 저장됨을 확인할 수 있습니다. jupyter_ws폴더로 이동하여 gedit로 config_han.json을 열어보면 한글 부분에 unicode 문자가 저장되어 있습니다.
2) with … as file
with open(...) as file:파일을 열고 작업이 끝나면 자동으로 닫아줍니다.
원래는 파일을 열면 마지막에 이렇게 닫아야 합니다.
file.close()하지만 with를 쓰면 자동으로 닫히기 때문에 더 안전합니다.
3) json.dump(config, file, …)
json.dump(config, file, indent=4, ensure_ascii=False)config 데이터를 JSON 형식으로 바꿔서 파일에 저장합니다.
예를 들어:
config = {
    "name": "드론",
    "speed": 10
}
이라면 config.json 파일에 이렇게 저장됩니다.
{
    "name": "드론",
    "speed": 10
}
4) indent=4
indent=4JSON 파일을 보기 좋게 들여쓰기합니다. 없으면 한 줄로 저장될 수 있습니다.
{"name":"드론","speed":10}indent=4를 쓰면 보기 좋게 저장됩니다.
{
    "name": "드론",
    "speed": 10
}
5) ensure_ascii=False
ensure_ascii=False한글을 그대로 저장하게 합니다.
이 옵션이 없으면 한글이 이런 식으로 저장될 수 있습니다.
"\ub4dc\ub860"ensure_ascii=False를 쓰면 이렇게 저장됩니다.
"드론"22. None
None은 값이 없다는 뜻입니다.
target = None아직 목표 지점이 없거나, 센서 값이 유효하지 않을 때 사용할 수 있습니다.
target_position = None

if target_position is None:
    print("No target position")
else:
    print("Move to target")
None을 비교할 때는 보통 ==보다 is를 사용합니다.
if target_position is None:
    print("target is none")
함수에서 실패를 표시할 때도 사용할 수 있습니다.
def find_nearest_obstacle(ranges):
    valid_ranges = [r for r in ranges if r > 0]

    if len(valid_ranges) == 0:
        return None

    return min(valid_ranges)

nearest = find_nearest_obstacle([-1, -1, -1])

if nearest is None:
    print("No valid obstacle data")
else:
    print(f"nearest obstacle: {nearest}")
23. Boolean 판단 규칙
Python에서는 값 자체가 참 또는 거짓처럼 평가될 수 있습니다.
다음 값들은 거짓으로 판단됩니다.
False
None
0
0.0
""
[]
{}
()
예를 들어 빈 리스트는 False처럼 동작합니다.
waypoints = []

if not waypoints:
    print("No waypoints")
값이 있으면 True처럼 동작합니다.
waypoints = [[0.0, 0.0], [1.0, 0.0]]

if waypoints:
    print("Waypoint list exists")
로봇 경로, 센서 데이터, 설정값 검사에서 자주 사용됩니다.
24. in 연산자
in은 어떤 값이 포함되어 있는지 확인할 때 사용합니다.
modes = ["manual", "auto", "emergency"]

if "auto" in modes:
    print("auto mode supported")
딕셔너리에서는 key가 있는지 확인할 때 사용합니다.
config = {
    "max_speed": 1.0,
    "wheel_radius": 0.05
}

if "max_speed" in config:
    print(config["max_speed"])
문자열에서도 사용할 수 있습니다.
message = "robot emergency stop"

if "emergency" in message:
    print("Emergency message detected")
25. min(), max(), sum()
센서 데이터 처리에 매우 자주 쓰입니다.
ranges = [1.2, 0.8, 2.0, 0.5]

print(min(ranges))  # 0.5
print(max(ranges))  # 2.0
print(sum(ranges))  # 4.5
평균값 계산:
average = sum(ranges) / len(ranges)

print(average)
라이다 거리 중 가장 가까운 장애물을 찾을 때:
lidar_ranges = [2.0, 1.5, 0.9, 0.7, 1.2]

nearest_obstacle = min(lidar_ranges)

print(f"nearest obstacle: {nearest_obstacle} m")
단, 빈 리스트에 min()을 사용하면 에러가 납니다.
ranges = []

if ranges:
    nearest = min(ranges)
    print(nearest)
else:
    print("No range data")
26. 정렬
리스트를 정렬할 때는 sort() 또는 sorted()를 사용합니다.
data = [3, 1, 4, 2]

data.sort()

print(data)
출력:
[1, 2, 3, 4]sort()는 원본 리스트를 직접 변경합니다.
반면 sorted()는 정렬된 새 리스트를 반환합니다.
data = [3, 1, 4, 2]

sorted_data = sorted(data)

print(data)
print(sorted_data)
딕셔너리 리스트도 정렬할 수 있습니다.
robots = [
    {"name": "robot_a", "battery": 80},
    {"name": "robot_b", "battery": 50},
    {"name": "robot_c", "battery": 95}
]

robots_sorted = sorted(robots, key=lambda robot: robot["battery"])

print(robots_sorted)
sorted() 함수는 robots 리스트를 정렬합니다. 이때 key 옵션에 lambda robot: robot[“battery”]를 넣었기 때문에, 각 로봇 딕셔너리의 “battery” 값을 기준으로 정렬합니다.
배터리 값은 robot_b가 50, robot_a가 80, robot_c가 95이므로 작은 값부터 정렬하면 다음과 같은 순서가 됩니다.
[
    {"name": "robot_b", "battery": 50},
    {"name": "robot_a", "battery": 80},
    {"name": "robot_c", "battery": 95}
]
마지막으로 print(robots_sorted)는 정렬된 결과를 화면에 출력합니다. 원본 robots 리스트는 그대로 두고, 정렬된 새 리스트가 robots_sorted에 저장됩니다.
배터리가 높은 순서로 정렬(내림차순)하려면 reverse=True를 사용합니다.
robots_sorted = sorted(
    robots,
    key=lambda robot: robot["battery"],
    reverse=True
)

print(robots_sorted)
27. 람다 함수
lambda는 이름 없는 짧은 함수입니다.
double = lambda x: x * 2

print(double(3))
하지만 로봇 개발 초보 단계에서는 lambda를 남발하지 않는 것이 좋습니다. 주로 sorted()의 key처럼 간단한 기준을 줄 때 사용합니다.
points = [
    {"x": 1.0, "y": 2.0},
    {"x": 0.5, "y": 1.5},
    {"x": 2.0, "y": 0.5}
]

points_sorted = sorted(points, key=lambda p: p["x"])

print(points_sorted)
28. zip()
zip()은 여러 리스트를 동시에 묶어서 반복할 때 사용합니다.
left_speeds = [1.0, 1.1, 1.2]
right_speeds = [1.0, 1.0, 1.1]

for left, right in zip(left_speeds, right_speeds):
    print(f"left={left}, right={right}")
출력:
left=1.0, right=1.0
left=1.1, right=1.0
left=1.2, right=1.1
시간과 센서 데이터를 묶을 수도 있습니다.
times = [0.0, 0.1, 0.2]
distances = [1.5, 1.4, 1.3]

for t, d in zip(times, distances):
    print(f"time={t}, distance={d}")
29. enumerate()
enumerate()는 반복하면서 인덱스도 같이 얻을 때 사용합니다.
waypoints = [
    [0.0, 0.0],
    [1.0, 0.0],
    [1.0, 1.0]
]

for index, point in enumerate(waypoints):
    print(f"{index}: {point}")
출력:
0: [0.0, 0.0]
1: [1.0, 0.0]
2: [1.0, 1.0]
시작 인덱스를 1로 바꿀 수도 있습니다.
for index, point in enumerate(waypoints, start=1):
    print(f"waypoint {index}: {point}")
출력:
waypoint 1: [0.0, 0.0]
waypoint 2: [1.0, 0.0]
waypoint 3: [1.0, 1.0]
30. 언패킹
리스트나 튜플의 값을 여러 변수에 한 번에 넣을 수 있습니다.
position = [1.0, 2.0, 0.5]

x, y, yaw = position

print(x)
print(y)
print(yaw)
웨이포인트를 처리할 때도 좋습니다.
waypoint = [3.0, 4.0]

x, y = waypoint

print(f"x={x}, y={y}")
함수 반환값에서도 자주 사용합니다.
def get_velocity():
    linear_x = 0.5
    angular_z = 0.1
    return linear_x, angular_z

linear_x, angular_z = get_velocity()

print(linear_x)
print(angular_z)
31. 가변 인자 *args
함수에 여러 개의 값을 유동적으로 전달하고 싶을 때 *args를 사용합니다. 개수는 정해지지 않아도 됩니다.
def print_values(*args):
    for value in args:
        print(value)

print_values(1, 2, 3)
print_values("x", "y", "z")
센서 값을 여러 개 받아 평균을 구할 수도 있습니다.
def average(*values):
    if not values:
        return 0.0

    return sum(values) / len(values)

print(average(1.0, 2.0, 3.0))
32. 키워드 가변 인자 **kwargs
**kwargs는 이름이 있는 여러 인자를 딕셔너리 형태로 받습니다.
def print_config(**kwargs):
    for key, value in kwargs.items():
        print(f"{key}: {value}")

print_config(max_speed=1.0, wheel_radius=0.05, use_lidar=True)
출력:
max_speed: 1.0
wheel_radius: 0.05
use_lidar: True
설정값을 유연하게 받는 함수에서 사용할 수 있습니다.
def create_robot_config(**kwargs):
    config = {
        "max_speed": 1.0,
        "wheel_radius": 0.05,
        "use_lidar": False
    }

    config.update(kwargs)
    return config

config = create_robot_config(max_speed=1.5, use_lidar=True)

print(config)
33. 얕은 복사와 깊은 복사
리스트나 딕셔너리를 다룰 때 매우 중요합니다.
a = [1, 2, 3]
b = a

b[0] = 100

print(a)
print(b)
출력:
[100, 2, 3]
[100, 2, 3]
b = a는 복사가 아니라 같은 리스트를 가리키는 것입니다.
진짜 복사하려면 다음처럼 합니다.
a = [1, 2, 3]
b = a.copy()

b[0] = 100

print(a)
print(b)
출력:
[1, 2, 3]
[100, 2, 3]
하지만 중첩 리스트에서는 문제가 생길 수 있습니다.
path_a = [[0, 0], [1, 1]]
path_b = path_a.copy()

path_b[0][0] = 100

print(path_a)
print(path_b)
중첩 구조까지 완전히 복사하려면 copy.deepcopy()를 사용합니다.
import copy

path_a = [[0, 0], [1, 1]]
path_b = copy.deepcopy(path_a)

path_b[0][0] = 100

print(path_a)
print(path_b)
로봇 경로, 설정 딕셔너리, 센서 데이터 버퍼를 복사할 때 이 차이를 모르면 버그가 납니다.
34. 타입 힌트
타입 힌트는 변수나 함수 인자의 자료형을 표시하는 문법입니다.
def calculate_speed(distance: float, time: float) -> float:
    return distance / time
이 부분은 함수가 결과로 float 값을 반환한다는 의미입니다. 즉, 계산 결과가 소수점 숫자일 수 있다는 뜻입니다.
Python은 타입 힌트를 강제로 검사하지는 않습니다. 하지만 코드를 읽기 쉬워지고, IDE나 코드 분석 도구가 실수를 더 잘 잡아줍니다.
로봇 개발에서는 타입 힌트를 쓰는 것이 좋습니다.
def limit_speed(speed: float, max_speed: float) -> float:
    if speed > max_speed:
        return max_speed

    if speed < -max_speed:
        return -max_speed

    return speed
리스트 타입도 표시할 수 있습니다.
def average(values: list[float]) -> float:
    if not values:
        return 0.0

    return sum(values) / len(values)
딕셔너리 타입도 표시할 수 있습니다.
def print_robot_config(config: dict[str, float]) -> None:
    for key, value in config.items():
        print(key, value)
None을 반환하는 함수는 -> None으로 표시합니다.
def stop_robot() -> None:
    print("stop")
35. dataclass
클래스 문법 자체는 별도 주제지만, Python에서 설정값이나 데이터를 묶을 때 dataclass는 매우 유용합니다.
from dataclasses import dataclass

@dataclass
class RobotPose:
    x: float
    y: float
    yaw: float
사용 예시는 다음과 같습니다.
pose = RobotPose(x=1.0, y=2.0, yaw=0.5)

print(pose.x)
print(pose.y)
print(pose.yaw)
일반 클래스보다 훨씬 간단하게 데이터 구조를 만들 수 있습니다.
로봇 설정값에도 사용할 수 있습니다.
from dataclasses import dataclass

@dataclass
class MotorConfig:
    motor_id: int
    gear_ratio: float
    encoder_resolution: int
    max_rpm: float

config = MotorConfig(
    motor_id=1,
    gear_ratio=30.0,
    encoder_resolution=4096,
    max_rpm=3000.0
)

print(config)
출력 예시:
MotorConfig(motor_id=1, gear_ratio=30.0, encoder_resolution=4096, max_rpm=3000.0)딕셔너리보다 구조가 명확하고, 오타를 줄일 수 있습니다.
36. with 문
with는 자원을 안전하게 열고 닫을 때 사용합니다.
가장 대표적인 예는 파일입니다.
with open("log.txt", "w") as file:
    file.write("robot started\n")
with를 사용하면 파일을 직접 close()하지 않아도 됩니다.
로봇 개발에서는 로그 파일, 설정 파일, 데이터 기록 파일을 자주 다루므로 with 문은 필수입니다.
나쁜 예:
file = open("log.txt", "w")
file.write("data\n")
file.close()
좋은 예:
with open("log.txt", "w") as file:
    file.write("data\n")
37. 모듈과 import: 기능 가져오기
Python은 필요한 기능을 가져와서 씁니다.
import math

angle = math.radians(90)
print(angle)
출력:
1.5707963267948966자주 쓰는 기본 모듈:
모듈 용도
| math | 수학 계산 |
| time | 시간 지연, 시간 측정 |
| random | 랜덤값 |
| os | 파일, 폴더 경로 |
| csv | CSV 파일 처리 |
| json | JSON 파일 처리 |
시간 지연 예제:
import time

print("모터 ON")
time.sleep(1.0)
print("1초 후 모터 OFF")
로봇 제어 루프 예제:
import time

while True:
    print("센서 읽기")
    print("제어 계산")
    print("명령 출력")

    time.sleep(0.1)
time.sleep(0.1)은 0.1초 대기입니다.
즉, 대략 10Hz 루프입니다.
38. 모듈 실행 진입점 if __name__ == “__main__”
Python 파일을 직접 실행할 때만 특정 코드가 실행되게 만들 수 있습니다.
def main():
    print("robot program start")

if __name__ == "__main__":
    main()
이 구조는 매우 중요합니다.
예를 들어 robot_utils.py 파일이 있다고 가정합니다.
def calculate_speed(distance, time):
    return distance / time

def main():
    print("test")
    print(calculate_speed(10, 2))

if __name__ == "__main__":
    main()
이 파일을 직접 실행하면 main()이 실행됩니다.
python3 robot_utils.py하지만 다른 파일에서 import하면 main()은 실행되지 않습니다.
from robot_utils import calculate_speed

speed = calculate_speed(5, 2)
print(speed)
로봇 프로젝트에서는 테스트 코드와 실제 재사용 함수를 분리할 때 꼭 필요합니다.
39. assert
assert는 조건이 맞는지 검사하는 문법입니다.
speed = 1.0

assert speed >= 0.0
조건이 거짓이면 에러가 발생합니다.
speed = -1.0

assert speed >= 0.0
메시지를 추가할 수도 있습니다.
speed = -1.0

assert speed >= 0.0, "speed must be positive"
로봇 코드에서는 계산 함수 테스트에 유용합니다.
def clamp(value, min_value, max_value):
    if value < min_value:
        return min_value

    if value > max_value:
        return max_value

    return value

assert clamp(5, 0, 10) == 5
assert clamp(-1, 0, 10) == 0
assert clamp(15, 0, 10) == 10
단, assert를 안전 로직으로 사용하면 안 됩니다. 실제 로봇 정지, 충돌 방지, 비상 정지 같은 기능은 명시적인 조건문으로 처리해야 합니다.
40. 유용한 표준 라이브러리
Python에는 기본으로 제공되는 라이브러리가 많습니다. 로봇 개발에서 자주 쓰는 것들은 다음과 같습니다.
1) math
수학 계산에 사용합니다.
import math

angle = math.pi / 2
print(math.sin(angle))
print(math.cos(angle))
거리 계산:
import math

def distance_2d(x1, y1, x2, y2):
    dx = x2 - x1
    dy = y2 - y1
    return math.sqrt(dx * dx + dy * dy)

print(distance_2d(0, 0, 3, 4))
또는 hypot()을 사용할 수 있습니다.
import math

distance = math.hypot(3, 4)

print(distance)  # 5.0
2) time
시간 지연이나 현재 시간 확인에 사용합니다.
import time

print("start")
time.sleep(1.0)
print("after 1 second")
현재 시간:
import time

now = time.time()
print(now)
간단한 주기 실행:
import time

period = 0.1

for i in range(10):
    start_time = time.time()

    print(f"loop {i}")

    elapsed = time.time() - start_time
    sleep_time = period - elapsed

    if sleep_time > 0:
        time.sleep(sleep_time)
3) os
파일 경로, 폴더 확인, 환경 변수 등에 사용합니다.
import os

print(os.getcwd())
파일 존재 확인:
import os

if os.path.exists("config.json"):
    print("config exists")
else:
    print("config not found")
폴더 생성:
import os

os.makedirs("logs", exist_ok=True)
4) pathlib
파일 경로를 다룰 때 os.path보다 보기 좋습니다.
from pathlib import Path

log_dir = Path("logs")
log_dir.mkdir(exist_ok=True)

log_file = log_dir / "robot_log.txt"

with open(log_file, "w") as file:
    file.write("robot started\n")
파일 존재 확인:
from pathlib import Path

config_path = Path("config.json")

if config_path.exists():
    print("config file exists")
5) csv
센서 데이터나 로그 데이터를 CSV로 저장할 때 사용합니다.
import csv

data = [
    [0.0, 1.2],
    [0.1, 1.3],
    [0.2, 1.1]
]

with open("sensor_log.csv", "w", newline="") as file:
    writer = csv.writer(file)
    writer.writerow(["time", "distance"])
    writer.writerows(data)
CSV 읽기:
import csv

with open("sensor_log.csv", "r") as file:
    reader = csv.reader(file)

    for row in reader:
        print(row)
41. 초보자가 자주 하는 실수
1) =와 ==를 혼동함
speed = 1.0=는 값을 넣는 것입니다.
if speed == 1.0:
    print("speed is 1.0")
==는 같은지 비교하는 것입니다.
2) 리스트 복사를 잘못함
a = [1, 2, 3]
b = a
이건 복사가 아닙니다. 같은 리스트를 가리키는 것입니다.
b = a.copy()또는 중첩 구조라면:
import copy

b = copy.deepcopy(a)
3) 빈 리스트에서 min() 사용
ranges = []

nearest = min(ranges)
이 코드는 에러가 납니다.
안전하게 작성해야 합니다.
if ranges:
    nearest = min(ranges)
else:
    nearest = None
4) 파일을 닫지 않음
나쁜 예:
file = open("log.txt", "w")
file.write("data")
좋은 예:
with open("log.txt", "w") as file:
    file.write("data")
5) 예외 처리를 너무 넓게 함
나쁜 예:
try:
    value = int("abc")
except:
    print("error")
좋은 예:
try:
    value = int("abc")
except ValueError:
    print("invalid number")
무조건 except:로 모든 에러를 숨기면 실제 버그를 찾기 어렵습니다.
5) 변수 이름을 대충 지음
나쁜 예:
a = 1.0
b = 2.0
c = a / b
좋은 예:
distance = 1.0
time_sec = 2.0
speed = distance / time_sec
로봇 코드는 센서, 좌표, 속도, 시간, 각도 단위가 섞입니다. 변수 이름을 명확하게 짓지 않으면 나중에 반드시 고생합니다.